
Add information to [[style]]
Open the [[style]] that you want to work on by going to [[styles]] > Search and then finding it in the [[styles]] table - you can search in a number of ways (eg by Description, Customer, Brand, etc)
In the [[style]] form you can now click on the relevant tab and enter the required information.
Colourways
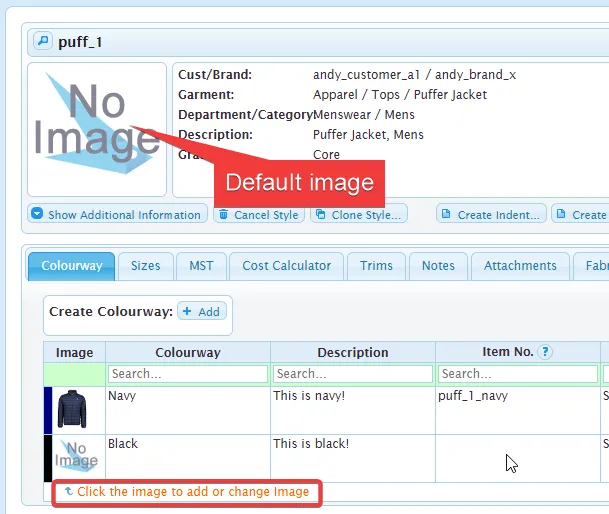
Section titled “Colourways”To add a colourway to a [[style]], click on Colourway tab > Add. In the Add a new Colourway form, enter the following:
- Colourway
- Season (optional - for reporting purposes)
- Description (optional)
- Item No. (optional - customer item number)
- Swatch Colour (optional)
You can also add a Colourway as a Pack. Packs are bundles of existing colours, e.g. a red pair of socks and a white pair of socks sold together.
To create a pack:
- Create the individual colours first (e.g. add WHITE, then add RED as a new line)
- Click the Make Pack button
- Choose the two colours you want from the dropdowns (you can have up to 5 items in the pack); If the pack is made up of the same colour, choose the same colour multiple times e.g. [2pk] White + White
When you save, the colourway line will display “[2pk] Red + White”.
To add a CAD image to the Colourway, click on the image placeholder and then select a file to upload. You can also set the image to be the [[style]] default, in which case it will be displayed as the main image for the [[style]].
Style Brief
Section titled “Style Brief”From the Colourway tab you can also print (or save as PDF) the [[style]] brief, or send it as an email attachment to your Supplier.
To print the [[style]] brief, click on the Print button on the relevant Colourway.
To email the [[style]] brief to the Supplier (or Customer), click on the Email button on the Colourway. You’ll be given the option to add additional Colourways to the Brief (either as extra indovidual files, or all together in one file), and to select a Supplier and/or Customer to send the email to. Once you have completed the relevant information, click Send.
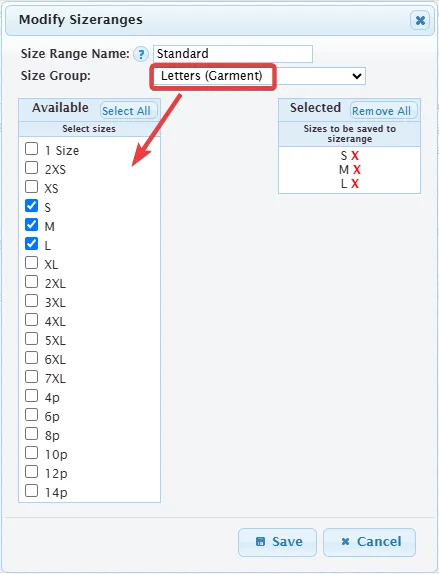
Click on the Sizes tab and click on Edit on the default Size Range box.
You can now select the type of Size Range that you want to add to this [[style]]. Optionally, you can also rename the Size Range. In the example below I selected the Size Group called “Letters (Garment)” and then selected the sizes that I wanted from that group. Note that I also re-named the Size Range to “Standard”
Multiple Size Ranges
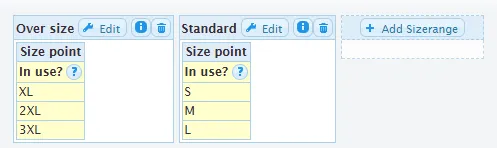
Section titled “Multiple Size Ranges”You can create more than one Size Range for a [[style]]. This is typically done so that you can assign different Costings to each Size Range. In the example below, I have created a second Size Range called “Over Size” so that I can set higher cost prices for the larger sizes of XL, 2XL and 3XL.
Size Defaults
Section titled “Size Defaults”When you place an order for your [[styles]] you need to specify the number of units for each size point. It is common to order according to a defined ratio of sizes. For example, you may order 5000 units spread across S, M and L sizes in a ratio of (1.5:2:1.5). If you set this ratio, Swift will aotomatically do the calculation of number of units per size point based on the defined ratio.
You can set the Ratio for the size points on the Sizes tab.
Cost Calculator
Section titled “Cost Calculator”The Cost Calculator is where you calculate the Cost Price and specify the WSP (Wholesalse Price) for the [[style]].
On the Cost Calculator tab, select a Colourway (and optionally a Size Range, if there is more than one for this [[style]]) and click on Create New Costing.
Basic Cost Items
Section titled “Basic Cost Items”Fill in the following information and click Save.
- Supplier
- No. of Units for this Colourway
- Factory Cost per unit
- Wholesale Price
This is the basic costing information that is required, but you typically need to include additional cost items.
Additional Cost Items
Section titled “Additional Cost Items”Optionally you can add these additional items to your costing calculations.
BoM Items
Section titled “BoM Items”This is typically used to enter the costs associated with the materials (eg fabric, trims) that you need to provide to a CMT manufacturer if this is a CMT Product Type (see CMT Guide for more information). However, for a FPP Product Type, you may still need to add some extra line items costs that are not included in the Factory Cost from your Supplier - this could include packaging items, swing tags, etc.
To add a BoM item, click on the BoM button, select a Costing Item to add and then enter the rating and price.
Your Administrator may have configured your system to include default BoM Costing items for certain [[styles]], in which case you’ll only need to check that the details are correct and click Save.
Freight Costs
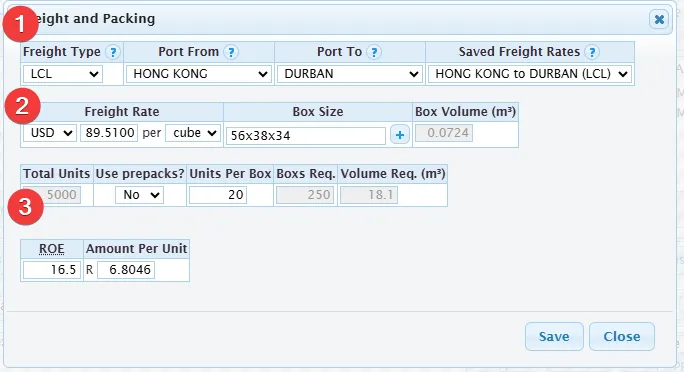
Section titled “Freight Costs”To add Freight Costs, click on the Freight button and then fill in the required information:
- Select a Freight Type (eg FCL or LCL) and then select the Port From and Port To - if there is a saved rate for this freight type on this route, you can select it from the dropdown.
- Enter the Freight Rate (or verify the rate populated from the saved rate) and select the Box Size that your items with be packed in for the shipment.
- Enter the number of units that are packed in each of the boxes specified in (2).
The per unit freight cost is displayed at the bottom of the form. Click Save
Duty & Clearing Costs
Section titled “Duty & Clearing Costs”To add Duty Costs, click on the D&C button and then fill in the duty percentage amount.
You can also include an amount to cover additional Clearing Costs - note that this is a pro-rata amount that you’ll need to enter manually.
Local Costs
Section titled “Local Costs”You can add any Local Costs that you want to allocate to your product costing - this could include local transportation or warehouse costs.
Click on the Local Costs button and then select a Costing Item to add and then enter the rating and price.
Discounts & Allowances
Section titled “Discounts & Allowances”You can include additional costs or deductions to cater for the following items:
- Finance Charges: adds on an extra amount to the cost price to make allowances for finance charges
- Insurance Charges: adds on an extra amount to the cost price to make allowances for insurance charges
- Reject Charges: adds on an extra amount to the cost price to make allowances for reject charges
- Agent Commission: adds on an extra amount to the cost price to make allowances for agent commission
- Royalty Charges: adds on an extra amount to the cost price to make allowances for royaty charges
- Discounts: represents the discount a customer will take, usually as part of an early settlement plan. It either SUBTRACTS an amount from the wholesaler price or ADDS an amount from the cost price, depending on your margin settings
Click on the Allowances button or Discounts button and then enter the relevant percentage amounnts that you want to be appled.i
Margin Calculation
Section titled “Margin Calculation”The Gross Margin for each Costing is calculated by dividing Gross Profit by Wholesale Price, i.e.
Gross Margin =
Costing Approval
Section titled “Costing Approval”Costings need to be approved on the [[style]] before you can create a [[indent]] or a [[po]].
On the costing you want to approve, choose your approver where it says Request approval by and then click the Req. Approval button.
If you want to request approval for multiple costings go to the main Menu and click Style > Bulk Costing Approval. Search for costings you want to have approved and tick the ones you want to send for approval. At the bottom of the report, choose your approver where it says Request approval by and then click the Req. Approval button.
You can add Notes to the [[style]] record to convey information to your Customer, Supplier or work colleagues.
To add a Note, ciick on the Notes tab and select a Note Type (eg General), and enter your Note text and click the Save button. You also have the option to send the Note to a colleague and to include the Note text on the [[indent]] sent to the Supplier, and the [[po]] sent to the Customer.

Attachments
Section titled “Attachments”You can add Attachments to the [[style]] - these could be:
- extra images you want included in the Style brief
- files you want to send to the the Supplier or Customer
- private files you want stored so that they are all in one place
To add an Attachment, click on the Attachments tab and then click on the Browse button to select your file.
You then need to select the Description type to define what happens with this attachment - if you select Image then it will be included in the PDF briefing document. Other Description types (Submission, Packing, Attachments) will be included as attachments to the briefing email. If you select Email Attachments as the Description type, then you can also specify whether the file should be included as an attachment on outgoing mails to the Customer and/or Supplier.